The fastest way to build a house with your own hands is to choose frame technology. At the same time, the construction of a frame house requires significantly less money than other types of construction. You can do all the work yourself by drawing up a detailed diagram and following step-by-step instructions. Many points are well covered in thematic videos; individual nuances become clear when viewing the photos posted in the article.
Most often, frame houses are built using two technologies: frame-frame and frame-panel. While using the 2nd method, installation work will have to be carried out using special equipment, the first technology allows you to do it yourself.
 Arrangement of a columnar foundation
 Having decided on the construction method, you should study the site in detail. The best option is when it is located on a hill and fairly dry. If there are old trees in the area allocated for construction, they must be carefully uprooted. If some of the roots remain, young growth will grow and this will lead to the destruction of the foundation.
Professional builders do not recommend building a frame house more than 2 floors high. Since the house turns out to be light, a strong foundation is not needed. Its purpose is to ensure a stable position of the frame. As for the type, columnar, strip, based on concrete blocks are suitable. For rigidity, reinforcement is laid in a strip foundation, and a grillage is installed in a columnar foundation, using a monolithic strip or channel for this purpose.
Caution: Avoid areas with unstable soil where groundwater comes close to the surface.
Step-by-step instructions for building a frame house with your own hands
The beauty of frame construction is that a house can be built within one season. At the same time, the low weight of the materials allows you to do without heavy construction machines and practically do all the work yourself.
As for quality, a correctly built and beautifully finished frame house is difficult to distinguish from a log house. In terms of finances, it will cost much less due to the fact that much less of this very timber will be needed.
Communications, subfloor
The frame house is designed in such a way that installation of communications is carried out during the construction of the foundation. For utility networks, depressions are made in the ground, waterproofed and insulated. At the same time, all connections are marked on the diagram in order to facilitate further installation.
 Construction of a house on stilts
 After this, they begin to install the subfloor. Often they opt for a concrete screed with a height of about 100 mm. Adhere to the following technology:
- install formwork;
- lay a heat and waterproofing layer;
- concrete is poured;
- install logs on the frozen screed;
- insulate the structure by placing basalt wool or expanded polystyrene between the joists;
- lay out the boards along the joists.
Frame
The next stage of construction is the construction of the frame. It is the basis of a house of this type and is a structure consisting of vertical posts, crossbars, and horizontal frames. It is made from both wood and metal. A wooden frame is a simpler and cheaper option; in this case, there is no need to use welding equipment.
 Construction of the frame
 For a wooden frame you need high quality wood with a maximum moisture content of 12%. The minimum cross-section of the beams is 15 x 15 cm, and the length is selected according to the height of the house. The corners are connected using the tongue-and-groove method so that there are no gaps at all. Beams are attached to the beams in increments of 30, 40, 60 cm, depending on what material is chosen for the cladding. Additional beams are laid under future windows. Cladding, boards, and OSB are used as exterior cladding of the house.
Before starting work, it is necessary to treat all the wood with an antiseptic and wait until it is completely absorbed. This is necessary not only to protect against rodents and insects, but also to ensure that the original shape and dimensions of the material are well preserved.
Attention: to ensure the durability of the frame house, do not use metal connections. Wood, in contact with metal, rots. The most reliable fastening is wooden dowels. For greater rigidity, the frame is secured with braces.
It will help you to properly arrange the frame of your future home by watching this video:
Walls
A frame wall consists of the frame itself and insulation. They are performed using the following technology:
- The outer side of the finished frame is covered with rolled waterproofing material.
- A sheathing is installed on top of this layer to provide a ventilated gap.
- The outside walls are sheathed with blockhouse, clapboard or other material.
- The free space between the racks is filled with insulation and secured with staples. At the same time, when they are going to live in the house permanently, they choose expanded polystyrene or mineral wool with a thickness of at least 50 mm. For the dacha option, thinner insulation is used.
- A layer of vapor barrier is placed on the inside of the wall and the sheathing is filled.
- Next comes the finishing layer. Most often, drywall is used for this purpose.
Advice: it is better when all the parts of the house are made of the same type of wood.
Internal partitions
Basically, partitions are mounted from the same timber as the main frame, although sometimes 100 x 50 mm timber is used, but only in one-story houses. The structure of the internal walls is simpler than the external ones.
 Frame house drawing
 If we consider a simple diagram, it includes the following elements:
- frame racks;
- insulation;
- 2-sided multifunctional or vapor barrier membrane;
- finishing.
You can also use ready-made, commercially produced sandwich panels, then all the work comes down to installing them and cutting out openings.
Window
Building codes state that windows should occupy 18% of the wall area. For a country cottage intended for permanent residence, the best option is double-glazed windows.
In places where the design provides for window openings and doors, vertical posts in the middle are cut out very carefully. At the top and bottom of the resulting opening, ideally even horizontal boards are fixed tightly to the resulting segments. After the roof installation work is completed, ready-made frames are simply inserted into these places.
Roof
A frame house has a simpler roof structure. Taking into account the fact that the greatest mechanical load falls on the frame, it must be constructed in accordance with all requirements. In this case, the roof can take on any shape that requires the installation of rafters of varying degrees of complexity.
 Scheme: arranging the roof of a house
 Options are selected based on the parameters of the house and its design features. Step-by-step installation is carried out as follows:
- A detailed installation diagram of the rafter system is carried out. The pitch is calculated based on the size of the rack, and the size of the spans is determined based on the cross-sectional area of the beams. In this case, the normal step is 40-100 cm, the span is 2.5-5 m.
- The rafters are mounted, securing them with roofing nails, plates, and corners. The support for the rafters is a rigidly fixed 10 x 10 cm mural. To connect the rafter legs, serrated overlays are used.
- They arrange the sheathing. Its type depends on the choice of roofing material. If it is a metal profile, then use a 5 x 5 cm beam. It is fastened every 0.5 m. A continuous sheathing of OSB is installed under the flexible tiles.
Attention: when spanning more than 5 m, support is installed under the rafters.
The ceiling for an unheated attic consists of the following layers:
- load-bearing beam;
- plank flooring;
- rough 9 mm floor made of OSB or DSP boards;
- heat and vapor barrier;
- DSP floor base;
- heat insulator;
- screed with a layer of waterproofing.
The material for the rafters is wooden beams, and the pitch of the rafters is equal to the pitch of the frame posts. Basically, frame houses have a pitched or flat roof.
Attention: when calculating the pitch, take into account both the load and the cross-section of the beams, spans, and coating material.
As you can see, the installation work of a frame house is not very complicated. To build such a house yourself, you will have enough information obtained after reading this article, but you will only need to contact professional builders for additional advice.
Construction of a frame house: video
The construction of frame structures has long become extremely popular. There is nothing surprising about this. This construction method is very attractive due to its simple technology, which allows you to carry out all the work on your own, without resorting to the help of hired workers. And the materials required for construction are not too expensive and quite affordable.
However, when deciding on the type, one should not proceed from the mass of the building alone.
The location on which the building is planned to be erected must also be taken into account. If it is clayey and heavy enough, then it will hardly be possible to do without a solid, monolithic foundation. If the soil has a normal sand content, then or is quite enough.
If a homeowner has doubts about the quality of the soil for construction on his site, he can check its type and composition with a local architectural office. You should not neglect it without first making sure that you can actually do without it. Natural materials of wood origin will be used in the proposed construction. Even for fully processed, high-quality material, it is better to avoid prolonged contact with water.
There are two schemes for building a frame house:
- All activities are completely self-guided. Ready-made blocks are not used: only original building materials;
- construction of a structure from fully finished, complete blocks, which are manufactured industrially.
Let's consider the first, more democratic option
Diagram of frame house components: laying the foundation
The material for the roof is selected according to the preferences and capabilities of the construction owner. It could be roofing felt, and much more. Like other installation work, installation of the frame also begins from the corners.
The ends of the roof frame are securely attached to the floor joists. The roof usually has the shape of an isosceles triangle. The distance between the rafters corresponds to the width of the material that is supposed to be used as insulation or coating.
It is convenient to assemble the roof frame on the surface of the ground, and then lift it and install it on the house.
Do-it-yourself cladding of a frame house
 Frame wall pie diagram
 Covering options may vary. This and more. A durable, waterproof material is laid under the overlapping sheathing, with a margin of 20-30 cm.
The walls are covered with the selected material, then the roof, windows and doors are inserted. The floors are laid last. The boards are hemmed under the laid joists, all the gaps formed between the boards and joists are filled with insulation.
If there is such a possibility, then it is better to make the floor insulation double-layer.
First, a layer of polystyrene foam, followed by mineral wool. When all the insulation is laid out, the floorboards are laid. They are placed perpendicular to the joists. For greater evenness and smoothness of the floor, you can top it with OSB boards or sheets of plywood. This is a rather complex process, so before starting work you should carefully study the technology. Those who are not well versed in construction work may not immediately understand what these components are.
These are important connection points between individual structural elements of a building. The most important among them are floors, walls and roofing systems. Each of the designated main nodes in its own design also has a certain number of node connections.
Let us list them in order, from the bottom of the building to the top:
- in corner joints this is the joining of the lower trim to each other; attaching the lower frame, consisting of timber, to the foundation surface;
- installation of vertical racks: first the corner racks are installed, and only then the remaining ones;
- reliable fixation of the upper trim, consisting of timber;
- connections that serve to securely fix the structure of the frame itself in both vertical and horizontal planes: this guarantees its rigidity and stability;
- fastening the ceiling beams to the timber frame above.
Connections of the main roof elements to each other:
- top trim and ;
- the rafters themselves at the very top, in the ridge area;
- and rafters;
- rafters and counter-battens;
- rafters and battens
All designated nodes are load-bearing, as they are responsible for the reliability and strength of the entire structure. Secondary nodes should also not be overlooked; they are no less important for the stability of the structure. These are interfloor ceilings and logs. Special fasteners are used as a proven connection of individual elements of a building.
Frame houses are very popular among developers. This is due to the fact that they are built in a short time, require a minimum of money, have excellent performance characteristics and are environmentally friendly.
If someone has a desire to start building just such a house, then in this article you can get information on how to do it. Here everything is described in stages. At the same time, it is meant that all preparatory, and most importantly, organizational measures have been carried out and permission to build a house has been obtained. What does that require?
The foundation is chosen at will and can be columnar, pile-screw, strip, etc. This article discusses an example of building a frame house with a pile-screw type of foundation.

This type of foundation is suitable for those areas where there is loose or unstable soil. This type of foundation has a number of advantages, such as:
- There is no need to use special equipment to build it.
- The foundation is erected in a short time: one day is enough to install it.
- Huge selection of building materials (piles).
- The foundation has excellent load-bearing characteristics.
- This is a cheap foundation option compared to other types of foundations.
- The foundation can be installed at any time of the year.
On a note! The presence of a pile-screw foundation does not allow for a basement in the house. This is a significant drawback of this option.
How to calculate the number of piles?
Piles must have the correct geometric shape and high-quality blades. You can select suitable piles from the corresponding table.
Screw pile (pipe diameter) Installation step Application
219
3-10
Houses, piers, hangars
159
2-5
Likewise
133
2-5
Likewise
108
2-5
Heavy gates, piers, hangars, houses, fences
89
2-4
Can be used as additional piles, for houses, outbuildings
76
1-3
Light buildings, terraces, signs, traffic signs
59
0.5-2
Likewise
On a note! In conditions where the soil is clayey, work should be carried out in dry, non-rainy weather. The piles are installed strictly vertically.
If thick piles are used, you will have to use special equipment. If you choose piles of the optimal diameter, you can get by with your own efforts. In this case, it is much easier to decide on the same level of installation of piles.
To begin with, the necessary markings are carried out on the site and the site is prepared. It is desirable that it be horizontally level and could serve as a kind of guide to the depth of immersion of the piles.
The next stage is determining the perimeter of the future foundation. To do this, metal rods are hammered into its corners, after which a rope is pulled between them. It is necessary to check that the future foundation has right angles.
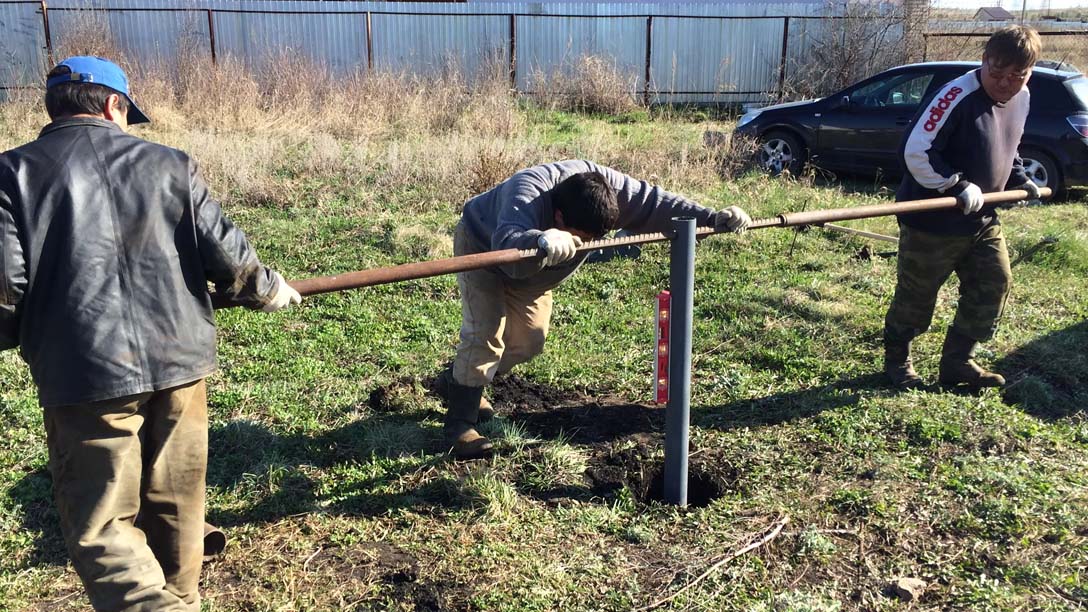
First of all, the piles are installed in the corners to a depth of at least 0.5 meters. Although it all depends on the type of soil. It is better to install the piles by two people: one screws them in, and the second controls the verticality. Having installed the piles at the corners of the building, they begin to install intermediate piles, which can be located at a distance of 0.7-1.2 meters from one another. All piles are screwed in to the required depth, after which they begin to level them, concreting and installing the caps on the piles.

For this operation, beams measuring 150x150 mm, 200x200 mm and 200x250 mm are suitable. Before laying the beams, the tops of the piles are coated with mastic and a couple of layers of roofing material are laid. This is the so-called waterproofing. The bars should be treated with an antiseptic.
The beams are mounted along the entire perimeter of the future building and connected to each other in half a tree using nails 120 mm long. All joints are reinforced with corners, which are fastened with nails 50-60 mm long.
The beams are attached to the base using screws; at the same time, they are placed in special heads and are well attracted by the screws.
A board is laid on top of the frame on the beams, which will cover the joints of the beams. The vertical posts of the future frame will be mounted on this board in the future. The board is nailed to the beam with nails 100-120 mm long.

The subfloor is mounted on logs measuring 100 by 150 mm, installed every 0.6 meters. The logs are connected to the frame using metal corners, after which a board is nailed on top of the logs.
Insulation is laid in the openings between the joists, and a vapor barrier film is spread on it. After this, everything is covered with plywood. Thick plywood is taken and it is attached to the joists. To ensure the floor is level, the logs must be installed in the same horizontal plane.

To install the frame, beams of the following sizes are taken: 100x50 mm, 150x50 mm, 200x50 mm. First of all, vertical posts are installed at the corners of the structure. They are fastened securely using reinforced metal corners. After this, proceed to the installation of the remaining racks, which are attached similarly to the corner racks. All racks are equipped with jibs that minimize loosening of the structure.

The upper beam is connected at the corners by means of cutting, and to other vertical posts using corners. For greater strength, diagonal slopes are installed.

Their installation can be done in three ways:
- Through cutting.
- Using perforated brackets.
- Using metal corners.
Alternatively, it is recommended to combine several methods at the same time. This may be the option of cutting down or the option of using corners. The beams are installed directly on the beam of the upper trim. Fastening can be done with self-tapping screws, but it is better to use nails, since they allow the wood to expand freely when humidity changes.

Installing a roof is a fairly labor-intensive operation that deserves to be described in a separate article.

For this purpose, a wide range of facing materials is available for sale, such as siding, timber simulator, artificial stone, etc. The work is carried out in the following order:
- At the first stage, a lathing made of wooden beams measuring 40x50 mm is installed. The sheathing pitch is 0.6 m. As an option, a CD-60 metal profile from plasterboard systems will be used.
- If the sheathing is made of wood, then it is advisable to cover it with an antiseptic and fire-resistant material.
- After the sheathing is ready, installation of the facing material begins.

During the work process, one should not forget about the insulation of a residential building. As a rule, everything is subject to insulation: floor, roof and walls. Don't forget about the vapor barrier film.

The building is almost ready, all that remains is to complete the interior decoration of the living space. There are many options here, especially since each room requires its own approach. And rooms such as the bathroom and kitchen are subject to exceptional types of finishing.
Photo report of building a frame house on your own
Here you can see step by step the construction of a frame house with your own hands on weekends.

It has long been known that frame construction is the fastest and most economical option for building a wooden house. Frame houses have several varieties, namely:
frame.
frame-panel;
The technology for constructing a frame house, depending on the insulation used and the structure used, is divided into Finnish and Canadian. The basis of any frame building is a wooden frame with insulation embedded in it, which is most often fire-resistant mineral wool. The house is covered with siding, clapboard, imitation timber and other materials. Thanks to its lightweight and durable construction, a frame house can become an object for implementing design ideas for home decoration.
What you need to know about frame houses
Before erecting the walls of a frame house, it is necessary to decide on the purpose of its use: will it be a temporary home (country house) or a house for permanent residence. The structure itself is a combination of vertical posts and horizontal frames. The building can be assembled block by block from ready-made panel walls, or a three-dimensional “skeleton” of the building can be erected on a ready-made foundation, and then sheathed with sheet material.
The decision to build a frame-panel house with your own hands will allow you to significantly save on building materials and earthworks. In addition, such houses have significant advantages: structural strength, the shortest construction time and low cost of materials. The production of trusses and wall panels is carried out from dried lumber, which completely eliminates possible shrinkage of the structure.
On a note: Work on the construction of a frame building can be carried out all year round, since there are no “wet processes” during the assembly process.
When building a house, you should take into account that a typical “pie” wall of a frame house does not have a ventilation gap. This entails the formation of condensation under the skin due to temperature changes, which in turn leads to damage to the wood. To avoid this, you can install an additional frame, which will increase the overall size, but will also reduce possible costs for reconstruction and renovation of the house in the future.
Choosing a foundation for a frame house
When laying the first stone of a future home, you need to be 100% confident in the strength and reliability of the building. That is why the choice of foundation should be approached very carefully. So which one should you choose? There are several options suitable for the power of the future home and the geological conditions of the site.
A strip foundation is the best option under conditions of dense soils and shallow freezing of the ground. Suitable for one-story construction, has uniform settlement, high reliability, at the same time labor-intensive and materially expensive.
Columnar foundation - made of concrete, brick, wood. Suitable for all types of frame houses, durable with minimal investment.
Pile foundation - used if there is a layer of silt or peat in the soil layers. Screw metal piles can support the weight of a two-story frame building. It is the most economical option of all listed.
A monolithic slab is the most expensive foundation option, which also serves as the ceiling of the first floor of the house. There is a high probability that the slab may tilt the house, so this issue is resolved when designing and studying the soil of the site.
On a note: Due to the fact that a frame house is light in weight, material costs, time and effort for laying the foundation can be successfully reduced.
Is it necessary to insulate a frame house?
Comfortable living implies the warmth and coziness of a home, which is why insulation of a frame house is considered the most important stage in its construction. Thermal insulation of walls not only prevents the penetration of cold into the room in winter, but also serves as protection from heat in summer. The technology for insulating the walls of a frame house consists of laying a layer of insulation between the frame posts.
The following types of insulation exist:
Mineral wool is the most common material for insulation. Available in the form of slabs and rolls, it has excellent sound and heat insulation. It is toxic and does not tolerate moisture well, as a result of which it must be used in conjunction with additional waterproofing.
Ecowool is a natural material that includes shredded newsprint impregnated with boric acid salts. Non-toxic, quickly installed, however, the installation itself requires the involvement of specialists.
Polystyrene foam is a lightweight and cheap material that does not absorb moisture, which means it does not require additional moisture-proof membranes. The disadvantage is flammability, which releases toxins, and poor sound insulation.
Polyurethane foam is a liquid component that is applied to the surface of the walls through a sprayer, foams and hardens, thereby providing good thermal insulation. It is non-flammable and non-toxic, and has a high cost compared to other insulation technologies.
On a note: When insulating with mineral wool, preference should be given, and it must be laid in layers of 50 mm with an overlap in order to prevent the penetration of cold.
Vapor barrier of walls - a whim or a necessity?

In order to avoid water vapor getting inside the insulation, which entails its damage and loss of heat-insulating properties, a vapor barrier is installed on the walls of the frame house. The vapor barrier membrane has a multilayer porous structure, which ensures air circulation not only through doors and windows, but also through walls.
The membrane has a smooth surface on one side and a rough surface on the other. Moisture settling on the rough side gradually evaporates, preventing the formation of mold and mildew inside the wall. It should be remembered that the installation of the membrane is carried out with the smooth side facing the insulation, and the rough side inside the room.
On a note: The vapor barrier membrane should be glued with special tape, avoiding the formation of tears and folds. Otherwise, the insulation will become unusable after 2-3 seasons.
Materials for exterior home decoration
It not only serves as the “face” of the house, but at the same time protects it from bad weather. The exterior of a frame house is finished using a variety of materials, the main ones being:
Siding is an affordable, durable and aesthetically attractive material that protects the walls of a house from snow, wind and rain. Currently, many types of siding have appeared - steel, wood, cement, vinyl. Fastening is carried out on a wooden sheathing and can be done on your own.
Decorative brick or stone - create the illusion of a stone cottage. A huge selection of various colors and textures allows you to turn a frame house into a work of art. The disadvantage is the weight of the structure and the high cost of materials.
A block house is a high-quality and economical option for finishing a house, reliably protecting it from bad weather. Self-installation allows you to significantly reduce the cost of facing work.
On a note: If desired, you can combine various techniques for decorating the facade, which will help give the building additional respectability, maximum security, as well as visually lighten, or vice versa, add volume to the structure.
The technology for constructing a frame house makes it possible to erect a building of this type within a period of 2 to 5 months, and weather conditions do not affect the construction. Frame houses maintain indoor temperature 2 times longer than houses made of blocks or bricks. However, in Russia they have not yet received due demand due to the insufficient number of professionals in this field.
Frame house construction technology video:
Prefabricated houses are attractive because once the foundation is ready, the house itself can be erected very quickly. For example, building a frame house with your own hands, with the help of two people, is possible in a month without haste. And this is if inexperienced workers are involved in the construction, who only know how to hold a hammer in their hands. This is because the assembly occurs step by step: regular repetition of simple actions. It is only important to know how to correctly assemble each unit. Having instructions and understanding the principle of construction, anyone can assemble a frame house on their own.
Frame construction is no less attractive because it can be done at minimal cost. How much money will be required for construction depends on the size of the house and the materials used (type and grade of wood, finishing materials). But in any case, this is one of the cheapest methods. (
Timber frame houses are not the only ones. There are regions where wood is a luxury. They put it there. Despite the fact that metal is not cheap today, it still turns out to be relatively inexpensive.
One more thing. Many people are interested in whether it is possible to leave a frame house unfinished, and if so, at what stages. The answer is yes, and the first stage is known to everyone: the finished foundation is left to winter. There are also possible wintering options in the following form:
- foundation + frame + roof (without floor);
- foundation + frame + roof + external cladding OSB + wind protection;
- foundation + frame + roof + external cladding OSB + wind protection + mounted and insulated floor and ceiling + partitions.
It is dangerous to leave windows and doors unattended over the winter. In other options, delaying the completion of construction is even a good idea: the wood will dry out. In winter, as a rule, there is low humidity and drying is active. At the same time, identify all the jambs in the already assembled part.

After pouring the piles, a grillage is installed, and the reinforcement is laid and tied into it. Longitudinal rods are connected to bent reinforcement outlets from the piles. At this stage, holes are left in the tape for supplying communications and (insert sections of plastic pipes across the tape).
The strapping beam will subsequently be attached to the foundation strip. To install it, studs are fixed in the tape. They are installed in increments of 1-2 meters. From each corner, a distance of 30 cm is required in both directions. Here, studs are required, the rest depending on the dimensions of the house, but at least every 2 meters. Please note that it is the studs that connect the frame of the house to the foundation. That’s why it’s better to deliver more often. And one more thing: no matter how short the wall is, there must be at least two studs.
When everything is ready, the concrete is poured.

After pouring the concrete, so that it does not dry out, but gains strength, it is better to cover it with polyethylene (look at the photo). If the temperature after pouring the foundation remains within +20°C, construction can continue after about 3-5 days. During this time, under such conditions, concrete will gain more than 50% of its strength. You can work with it freely. When the temperature drops, the period increases significantly. So at +17°C you need to wait about 10 days.
Step 2: Bottom Rail and Floor
To prevent the wood of the frame from drawing moisture from the concrete, cut-off waterproofing of the foundation is necessary. The safest way to do this is with bitumen mastic. And it’s better - in two layers. You can also use roll waterproofing. Roofing felt is cheaper, but it breaks over time. Waterproofing or other similar modern material is more reliable.
You can coat the grillage once with mastic, and roll out waterproofing on top. Another option for cut-off waterproofing under a frame house is two layers of waterproofing coated with mastic: the closer the groundwater is, the more thorough the waterproofing should be.

The first layer is liquid waterproofing. While it is not dry, you can glue a layer of rolled waterproofing on it.
Then the beds are laid - boards measuring 150 * 50 mm. They must be dry, impregnated with bioprotective and fire-retardant compounds. The edge of the bed is aligned with the outer edge of the foundation. In the necessary places, holes are drilled for the studs (the diameter of the hole is 2-3 mm larger than the diameter of the stud). Then the second board is laid. It is placed so as to cover the joint of the first row. It turns out to be a castle.

The second board is laid so that the joints overlap
In general, you can lay one beam of 100-150 cm, but its price is much higher than two boards, which together give the same thickness, and properly fastened two boards have a greater load-bearing capacity, although their installation takes more time. To make them work as a single beam, they are knocked down with nails in 20 cm increments in a checkerboard pattern.
We install the harness and logs

The next stage is installation and installation of the logs. These are the same 150*50 mm boards placed on edge. They are attached with two oblique nails (9 cm) at the end to the trim board, two nails on the right and left to the bed. So each lag is on both sides.

The photo shows that the first joist is installed close to the second - this way the load is better transferred to the foundation. It is installed along the second edge of the bed. The installation step is 40-60 cm. It depends on the length of the span and the cross-section of the lumber used: the longer the length, the smaller the step.

If the logs are long and there is a cross beam, as in the photo above, to prevent the logs from “moving away”, jumpers are placed above the cross beam. Their length is equal to the step of installing the logs minus the double thickness of the board: if the step of the log is 55 cm, the thickness of the board is 5 cm, then the jumper will be 45 cm long.
Insulation and flooring
After the base for the flooring has been installed, it is time to insulate the floor. It can be done in different ways, with different materials. We will show you an economical option - with polystyrene foam boards with a density of 15 kg/m3 (more is possible, less is not possible). It is, of course, not environmentally friendly, but it is the only one that is not afraid of moisture and can be installed without a subfloor. The estimated thickness of the insulation is 150 mm, two layers are laid: one 10 cm, the second 5 cm. The seams of the second layer should not coincide with the seams of the first (they shift).
To begin with, a 50*50 mm cranial block is packed along the lower edge of the log. It will hold the foam.

The foam is cut with a regular hacksaw. The blade can be used for wood - it cuts faster, but you get a torn edge, or for metal - it cuts slower, but the edge is smoother. The cut slabs are laid in two layers, the seams overlap. Then they seal the perimeter with sealant to ensure waterproofing.

Next, lay the subfloor from boards, level it and lay plywood on top (preferably FSF 5-6 mm). To prevent the rough flooring of boards from warping, lay the boards alternating the direction of the wave. If you look at the cross section of the board, the annual rings go in a semicircle. So, you need the arc to look up and down (see photo).

You can do without plank flooring. Then the thickness of the plywood should be at least 15 mm. Consider what is more profitable in your region and choose.
In any case, the sheets should be laid in a spaced pattern - the seams should not match (as in brickwork). Also, do not forget to leave a gap of 3-5 mm between the sheets of plywood to compensate for changes in size when humidity changes.

The plywood is attached with self-tapping screws 35 mm long (preferably white ones - less waste) around the perimeter in increments of 12 cm, inside in a checkerboard pattern in increments of 40 cm.
Step 3: Frame Walls
There are two ways: the wall frame is assembled (all or part, depending on the size) on the floor, then raised, positioned and secured. Sometimes with this method, OSB, gypsum fiber board, or plywood are attached directly to the floor on the outside of the frame: the rigidity is greater. This technology is called frame-panel or “platform”. Factories generally operate on this principle: they build ready-made panels according to the design in the workshop, bring them to the site and only install them there. But frame-panel house construction is possible with your own hands.

The second method: everything is assembled gradually, locally. The beam of the bottom frame is nailed, the corner posts are set, then the intermediate posts, the top frame, etc. This is the technology called “frame house construction” or “balloon”.

Which one is more convenient? It depends on how many people work and whether it is possible, at least periodically, to attract help. Working on the floor is faster and more convenient than jumping up/down a stepladder countless times. But if the section is assembled large, then it will be difficult even for two people to lift it. The solution is either to call help or to break the wall frame into small segments.
Installation pitch and cross-section of racks
Corner posts should be 150*150 mm or 100*100 mm, depending on the load and the required width of the insulation. For a one-story frame house, 100 mm is enough, for a two-story frame house - at least 150 mm. The intermediate posts are the same in depth as the corner posts, and their thickness is at least 50 mm.
The installation step of the racks is selected taking into account the load, but in reality it is more often selected based on the width of the insulation. If you will be insulating with mineral wool in rolls or mats, first find out the actual width of the material. The gap between the posts should be 2-3 cm less than the width of the insulation. Then there will be almost no waste, no gaps and cracks through which heat will escape. The density of installation of insulation in frames is the main point, because only it will serve as protection from the cold. The slightest violation will lead to the fact that the house will be cold. Therefore, the selection of insulation and its installation must be treated with full attention.

Fastening the racks is possible in several ways: with wooden dowels, with a notch or on corners. The cut into the board of the bottom trim should be no more than 50% of its depth. The corners are attached on both sides. Fastening with dowels is an old technology, but difficult to implement: long dowels are planed, a hole is drilled obliquely through the stand and beam of the lower trim, a wooden tenon is driven into it, the excess of which is cut off. It works well if the wood used is dry. If not, drying out and loss of fastening rigidity is possible. Installation on reinforced corners is much easier.
According to Canadian technology, the beams to which windows and doors are attached are made double. There is more load here, therefore the support must be more powerful.

Reinforced counters near windows and doors are a must. This is the only way a frame house built with your own hands will be reliable
Bevels or braces
If the outer cladding is planned to be made of high-strength board material - OSB, gypsum fiber board, gypsum fiber board, plywood - the slopes are placed temporarily and from the inside of the room. They are needed to level and maintain geometry until the outer skin is attached. The strength of this material is sufficient to create the required structural rigidity.
If the cladding is planned to be made up of linings, etc. installation of permanent jibs is required. Moreover, the best option is not those that are placed on several racks, but four small pieces for each: two on top and two on the bottom (as in the photo below).

Please note that in the photo above the racks are prefabricated: two boards are nailed together along the entire length in a checkerboard pattern. Such racks have even greater load-bearing capacity than solid ones and cost less. This is a real way to reduce construction costs without losing quality. But construction time increases: you have to hammer in a lot of nails.
Corners of a frame house
The most questions arise when constructing corners. If you place a beam in a corner, then there seem to be no difficulties, except that the corner turns out to be cold. In regions with short and mild winters this is not a problem, but in central Russia it requires some kind of solution.

There are several ways to make the corner of a frame house warm. All of them are shown in the diagrams, so it’s clearer.


After assembling the frame, it is most often sheathed on the outside with OSB, plywood or other similar material.
Step 4: Covering
The floor beams rest on the beam of the upper frame. There are several mounting methods:
- on supporting steel brackets;
- on the corners;
- with insert;
Notching - the depth of the cut should not exceed 50% of the thickness of the top frame timber. It is hammered in from above with two nails, which must go into the harness at least 10 cm. Corners are the usual method. You can use reinforced, but not necessarily perforated staples - the shape may vary
The dimensions of the beams and the pitch of their installation depend on what will be on top. If the second residential floor or, the cross-section is taken larger, the step is made smaller: so that the floor does not sag. If only the roof and attic on top are assumed to be non-residential, these are completely different calculations and dimensions.

If a second floor is being built, the ceiling is sheathed with the subfloor of the second floor. This will make it easier to work on creating the second floor of a frame house. Its assembly is no different from the construction of the first one. The only reason is that all the lumber has to be hauled to the second floor.
Step 5: Rafter system and roofing material
When developing a house project using frame technology, the most popular are or. Their device is no different. All the same principles and calculations. The only limitation concerns the weight of the roofing: it must be a light material, the load from which wooden beams and ceilings can withstand.
To fix the rafters in a given position before the sheathing was filled, temporary jibs were used
Another relatively inexpensive technology
Step 6: Insulation
A frame house can be insulated with any of the materials available on the market with the appropriate characteristics. All of them are imperfect, but all problems have standard solutions.
The most popular insulation for frame walls is basalt wool. It is available in the form of rolls or mats of different densities. It is more convenient to install mats in walls: they are denser and hold themselves well due to the pushing force. To do this, as mentioned above, their dimensions should be 2-3 cm larger than the distance between the frame posts. The mats, of course, are additionally fixed with special fasteners, but it is more convenient to work with than with a soft roll.

Mineral wool has high thermal insulation characteristics and good sound insulation. But there is also a serious drawback: it is afraid of getting wet and it must be protected on all sides not only from moisture (rain), but also from the penetration of steam. Therefore, from the side of the room it is covered with a layer of vapor barrier membrane, which prevents vapors from penetrating inside.
On the street side, the thermal insulation made of mineral wool is covered with another membrane, but of a different type with different characteristics: a hydro-wind-protective vapor-permeable membrane. It is not blown, does not allow moisture in liquid or gaseous states to pass through from the street, and vapors can escape from the insulation: vapor permeability is one-sided. After installing the insulation, only finishing work remains. Actually, that's it, construction is over.

Now you know how to build a frame house. The detail of some processes is far from complete, but you have a general assembly sequence. Perhaps another video from a professional carpenter who has been building frame houses for decades will help you (see below).
Video instructions for installing frame houses
These are three videos of excellent carpenter Larry Hohn. Each of them lasts more than an hour. The technology for building a frame house on a finished foundation is described in great detail.
According to these instructions, self-construction is possible without any questions: all stages of building a frame house and small details are commented on and explained, down to what nails, what length, how many pieces in what increments, should be hammered into each node. The main problems that may arise and methods for correcting them are demonstrated. If you decide to build a frame house with your own hands, take the time to watch the movie. Much will become clearer to you.
The first part is the lower trim and the floor.
The second part of the video is the design and assembly of frame walls.
The third part is building the roof of a frame house.
If you still doubt whether to build a frame house, it’s probably because you’ve heard that this is a bad technology, that it doesn’t work for us. There is such an opinion. But it is based on the fact that Canadian and American frame houses are built from dry wood, with moisture. no more than 20-22%. In our conditions, wood is brought from the sawmill with almost natural humidity, and this is up to 60%. That’s why the houses twist and turn, they become cold.
But if you are planning to build a house with your own hands, what will stop you from using dry wood? Kiln drying is expensive, the difference per cubic meter is very significant - almost twice. But by stacking the wood on the site in ventilated piles, it can be dried to the same 20-22% within a year. You decide for yourself whether or not to impregnate it with bioprotection before drying. Dry wood does not rot or be damaged by fungi, but it is advisable to impregnate it with bioprotection against insects.
An example of this opinion is in the video. With an explanation of why the technology is bad...