To make the foundation correctly, you need to carefully study the options for construction types and their features. The construction of the underground part is carried out taking into account the following requirements:
- economic expediency;
- reliability;
- strength;
- durability;
- sustainability.
Before starting construction work, a soil study should be carried out. The choice of the right type of foundation is influenced by the total weight of the house, the strength of the soil and the groundwater level. A foundation that is carefully made and built in compliance with technology will last a long time and will not cause problems during operation.
Preparatory stage
It’s worth starting with pits or drilling. The main goal of this activity is to find out what soils are located on the site, as well as to find out the level of groundwater. The foundation must be laid in compliance with the rule: the mark of the sole must be at least 50 cm above the level of the water horizon.
How to do soil testing correctly? Two methods are used for this:
- excerpts of pits (deep holes, dimensions in plan are usually 1x2 m);
- manual drilling.

In the first case, the soil on the walls of the pit is examined. They also check to see if water has left the bottom. In the second option, the soil on the tool blades is examined.
Once you have determined what kind of soil is on the site, you will need to find its strength indicators. This can be done using special tables.

The cost of laying the foundation for a house can be up to 30% of the estimate for the entire building. To avoid cost overruns, you need to perform a calculation that will allow you to find the optimal design parameters that will simultaneously guarantee minimum costs, strength and reliability. For your convenience, you can use online payment.
Types of foundations
Building a foundation with your own hands involves the use of several technologies:
- ribbon;
- combined options.
Columnar supports have a low load-bearing capacity. It is possible to install monolithic pillars or assemble them into compact concrete blocks. Both options are great for DIY projects.

There are three types of pile foundation for a house:
- driven (not recommended for private buildings due to the need to attract equipment);
- (suitable for building a brick or concrete house);
- (ideal for light wooden buildings).


Piles make it possible to reduce the amount of excavation work. There is no need to dig trenches or a foundation pit or transport large amounts of soil outside the site. Thanks to this quality, installing this type of foundation is a very economical choice. The main disadvantage will be the impossibility of equipping a basement or underground for utilities. In this case, the base of the building is covered with decorative materials.
Another advantage of piles is the possibility of using them in wetlands. Even if the groundwater level is located close to the ground surface, the supports provide the necessary load-bearing capacity.
The next option is tape. It can be made monolithic or from blocks. The second option is rational to use for mass construction. Strip foundations are:
- recessed (for buildings with a basement, brick and concrete structures);
- (for wooden and frame houses);
- non-buried (technology of pouring foundations for small buildings on a solid foundation).


Before making a tape, it is worth checking the groundwater level and compliance with the rule that the sole cannot be closer than 50 cm to the groundwater horizon. Otherwise, there is a high probability of flooding of the basement, reducing the load-bearing capacity of the foundation and destruction of the materials of the supporting part of the building.
What to do with high groundwater level? If the structure is made independently from brick or stone, screw piles will not be suitable, and for bored piles it will be necessary to lower the water level. An excellent option would be filling. In this case, a non-recessed or slightly recessed base is made. The thickness of the slab is determined depending on the load, on average 300-400 mm.
How to pour a foundation for a house
Monolithic foundation type is the best option for private housing construction. In this case, laying can significantly save on transportation and installation of structures. There is no need to hire a crane to install elements in the designed position or a KamAZ truck to transport concrete blocks and slabs.
Monolithic foundations can be made from factory-made concrete or you can mix the solution yourself using a concrete mixer. The first option is recommended. The fact is that it is very difficult to strictly observe the proportions of the composition in artisanal conditions. For factory-mixed concrete, such a guarantor will be a passport, which indicates the verified indicators of the material.
To make the material yourself, you will need to prepare clean water, cement, sand and crushed stone (or gravel). They are mixed with each other strictly observing proportions, which depend on what grade of concrete needs to be obtained. If you add a little more sand or crushed stone to the composition than required, the strength of the supporting part of the building will suffer.

To properly pour the foundation, you need to familiarize yourself with the basic rules of concreting:
- Concrete must be poured in one go at time intervals of up to 1.5 hours. If you take long breaks in work, the solution sets and concreting joints form, which weaken the structure. The technology allows making horizontal seams if absolutely necessary. It is unacceptable to install vertical seams on a monolithic foundation, since in this case the support of the house will not be able to resist soil deformations.
- The class of concrete is chosen depending on the type of supporting part. For a columnar or pile foundation, class B 15 is sufficient. For tape, grades from B 15 to B 22.5 are needed. Construction of a house foundation using slab technology requires concrete grades B 22.5 or B 25.
- After pouring, the material should gain strength. On average, this takes 28 days. Construction work can continue after the structure reaches 70% of its original strength.
- It is better to carry out work in warm, dry weather. The ideal average daily temperature for concrete hardening is +25°C. At temperatures below +5°C the material practically does not harden. For normal hardening in this case, special additives and heating are used.
- The concrete must be maintained within 1-2 weeks after pouring. It involves wetting the surface with water.
- To mix the mixture yourself, you will need cement, sand, crushed stone (gravel) and clean water. The proportions depend on the strength class. The material is delivered from the factory using a concrete mixer truck - it allows you to extend the life of the solution and deliver it over relatively long distances.
How to pour the foundation correctly? In general, work is performed in the following order:
- installation of formwork and reinforcement cage;
- laying waterproofing material in formwork;
- pouring concrete;
- its compaction by vibration or bayonet;
- curing;
- stripping works (if necessary).
To quickly complete the work, it is recommended to order a concrete pump together with a concrete mixer. Concrete manufacturers are usually willing to provide this technique. In this case, it is necessary to use a concrete mixture of grades P3 or P4 in terms of mobility. Otherwise, the equipment breaks down.
Step-by-step instructions for pouring a strip foundation
Concreting is considered using the example of a monolithic tape. To erect the supporting part of the structure, construction is necessary. To do this, use cast-offs and construction cord. You need to show the edges of the tape.

After marking, the soil is excavated. If there is no basement, it is enough to dig a trench. At its bottom you need to make a sand cushion. It performs several functions:
- ground leveling;
- prevention of frost heaving;
Next stage - . For this purpose, the material included in the estimate is used: boards (removable type) or polystyrene foam (non-removable). The second option serves not only as a form for pouring concrete, but also as insulation of the underground part of the building. When installing the formwork, I raise the base to the desired height.
A shallow strip foundation (MSLF) is a type of strip foundation, which is located 0.3-0.7 m below the zero level. The construction of this type of foundation requires a minimum of financial and labor costs. MZLF is excellent for light buildings erected on various soils. The foundation has its advantages and disadvantages, as well as a special construction technology.
Shallow strip foundation: scope of application, pros and cons
The bearing capacity of MZLF, in comparison with foundations of other types, is assessed as average and largely depends on the type of soil on the site. A shallow foundation is suitable for the construction of country houses, timber buildings, frame houses, as well as outbuildings, bathhouses, barns, etc. For brick houses, large cottages made of foam concrete and aerated concrete blocks, a shallow foundation is not suitable. For such buildings, an excellent option would be a combined foundation on piles, for example, a shallow pile-strip type on bored supports.
It is advisable to build a foundation of this type on slightly heaving and non-heaving soils. The ideal option is sandy and sandy loam soils with low moisture content. The groundwater level must be at least 0.5 m below the laying depth. On clay, the construction of an MZLF is accompanied by difficulties, because Most clay soils are classified as medium- and high-heaving soils. We will consider the features of constructing a foundation with a shallow laying depth on heaving soils below.
The advantages of this type of base include
- economical, concrete consumption is 30% lower than when constructing a conventional recessed strip foundation or a foundation with a monolithic floor slab;
- ease of construction, you can build it yourself without the involvement of workers and special equipment;
- small amount of excavation work - a narrow trench with a depth of no more than 0.7 m is dug;
- small area of contact between the structure and the ground.
Among the disadvantages of MZLF they note
- pouring is carried out at stable temperatures above +10 C;
- limited use due to low load-bearing capacity
- construction is possible only on a flat surface with a slope of no more than 5 degrees;
- lack of a basement in the house.
Expert opinion
Sergey Fedorov
Professional builder. 18 years of experience
Ask a question to an expertIf you are planning to build an MZLF foundation and “freeze” the construction, then keep in mind that you cannot leave the foundation unloaded during the winter! When the soil freezes, it will push out the monolithic tape, which will lead to a violation of its integrity.
Features of the design of a shallow foundation
A shallow monolithic strip foundation is erected on a flat surface. When building a house on a slope, you will have to combine MZLF with a pile foundation, using supports to level out the height difference. In terms of strength and resistance to deformation, the structure must comply with SNiP 2.03.01-84.
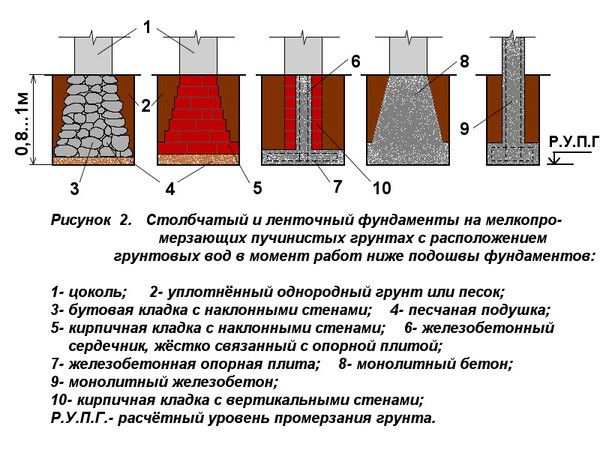
In cross-section, a shallow foundation looks like this:
Features of MZLF that must be taken into account during calculation and construction:
- The depth of the foundation base depends on the depth of soil freezing.
- Be sure to install a cushion made of dry bulk materials: a mixture of coarse sand and gravel.
- When the groundwater level is high, drainage is performed under and around the foundation.
- The base on which the monolithic tape is installed is compacted as much as possible.
- It is necessary to arrange a blind area to drain rainwater and snow.
Taking these features into account, we can conclude that the backfill and blind area are an integral part of the shallow foundation. Requirements for the blind area are specified in SNiP 2.02.01–83.
Calculation of a shallow strip foundation
Calculating the MZLF, which is being built on low- and non-heaving soils, is not difficult. During the calculation, three main parameters are determined:
Laying depth
Determined on the basis of SN “Foundations and Foundations”. The document specifies the following minimum depth values for the foundation base:
- when the soil freezes less than 2 m - 50 cm;
- when the soil freezes to a depth of 3 m - 75 cm;
- when the soil freezes more than 3 m - 100 cm.
For most regions of the middle zone, the depth of the MZLF will be 50 cm. For light buildings, such as a frame barn or a small country house, this parameter can be reduced to 30 cm.
Width of monolithic tape
In order not to make complex calculations, we recommend taking the width of the sole based on the table:
| Wall and ceiling materials | Number of floors | MZLF sole width, m |
| Walls made of lightweight brickwork or aerated concrete with reinforced concrete floors | 1 | 0,6 |
| 2 | 0,8 | |
| 3 | 1,2 | |
| Timber frame walls with timber ceilings | 1 | 0,4 |
| 2 | 0,4 | |
| 3 | 0,6 | |
| Log walls with wooden ceilings | 1 | 0,3 |
| 2 | 0,4 | |
| 3 | 0,6 | |
| Walls made of timber with wooden floors | 1 | 0,2 |
| 2 | 0,3 | |
| 3 | 0,4 |
Height above ground level
The higher the monolithic strip rises above ground level, the better the floors of the house will be protected from dampness and cold. However, the height of the foundation to maintain stability and load-bearing capacity must correlate with its width. The best option: the height of the tape above the zero mark is equal to its width.
Example: The laying depth is 50 cm. The width of the monolithic tape according to the table is 30 cm. This means that the height above ground level will be 30 cm, and the height of the entire monolithic tape will be 80 cm. The height of the ground part of the MZLF should not be lower than the snow level. The snow depth value depends on the region (you can find it on the Internet). For regions of the middle zone, this value does not exceed 8-10 cm.
What kind of house do you want to build?
Choose 3 options
House made of aerated concrete
Total score
Log house
Total score
House using Canadian technology
Total score
Brick house
Total score
House made of timber
Total score
House made of sip panels
Total score
Calculation of MZLF on heaving soils
When building a house on heaving soils, more complex calculations are performed, the purpose of which is to determine the heaving deformation. It is quite difficult to make such a calculation yourself, so you need to entrust it to professional designers or use a ready-made table:
| Name and degree of soil heaving | Number of floors of the building | Width of foundation base b, m | Thickness of the pillow t, m | Foundation design option | Reinforcement option |
| clays, loams and sandy loams, fine and silty sands, moist - medium sandy | 1 | 0,3 / 0,2 | 0,6/0,7 | G. | 3 |
| 2 | 0,3 / 0,2 | 0,5 / 0,6 | G. | 3 | |
| 3 | 0,3 / 0,2 | 0,4 / 0,5 | G. | 3 | |
| clays, loams and sandy loams, fine and dusty sands, moist - highly heaving | 1 | 0,3 / 0,2 | 0,7 / 0,8 | G. | 4 |
| 2 | 0,3 / 0,2 | 0,6 / 0,7 | G. | 4 | |
| 3 | 0,3 / 0,2 | 0,5 / 0,6 | G. | 4 |
In column 2 “Sole width” and column 3 “Cushion thickness”, the values for heated and unheated rooms are indicated through the sign /. The column “Reinforcement option” indicates the minimum number of reinforcing bars that must be used to reinforce the monolithic strip.
Construction of a shallow foundation: construction technology
The technology for constructing MZLF is not complicated; filling can be carried out according to SNiPs 3.03.01-87, 2.02.01-83 or according to our instructions. The foundation for a frame house 10 x 10 m can be poured in 1-2 days. Before you start pouring, you need to decide where you will take the concrete solution. There are two options:
- 1order concrete class B22.5...B17.5 at the nearest RBU. In this case, the mixture will be delivered to you at the specified time by a concrete mixer truck. If the ABS cannot reach the pouring site, then a special hose is used through which the concrete solution will be supplied to the formwork. Ordering a sleeve will slightly increase the cost of ABS services. In addition, you will have to pay for every hour of downtime of the special vehicle.
- 2 prepare concrete yourself. At the same time, you will not depend on RBU and will spend significantly less money, however, the quality of the concrete mixture will be slightly lower. When mixing concrete, the recipe must be strictly followed. To prevent concrete from starting to set ahead of time, you can use special additives. You can begin preparing concrete immediately after installing the formwork.
Installation of MZLF: step-by-step instructions from A to Z
Preparatory work and marking
The installation of a shallow foundation begins with site preparation, which consists of removing debris and uprooting stumps. The top layer of soil with vegetation is cut off. If necessary, leveling and filling of soil is carried out, followed by compaction.
The marking is carried out as follows: the perimeter of the future foundation is established, beacon pegs are driven into the corners. Ropes are stretched along the future monolithic tape.
The diagonal between the corners must be strictly 45 degrees. You can check the evenness of the markings using a tape measure and a building level.
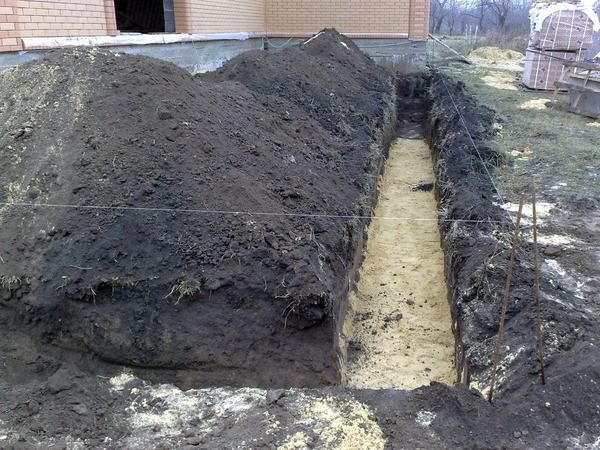
Construction of trenches and cushions
The depth of the trench depends on the depth of the foundation and the thickness of the cushion. The width of the trench is made 10 cm wider than the calculated thickness of the monolithic tape. This is necessary for installing the formwork. When constructing MZLF on loose soils, the slopes of the trench can be strengthened with boards. Pillowing is necessary to reduce the impact of frost heaving forces on the foundation. The thickness of the cushion, as a rule, is 20-30 cm for slightly heaving and non-heaving soils. For heaving ones - determined according to the table given above.
For corners where the walls of the future house intersect, it is necessary to strengthen the reinforcement frame by installing additional vertical rods, which are welded to the longitudinal rods. This reinforcement allows the strip foundation to withstand critical loads acting at the intersection of walls.
You can lay the reinforced frame on a prepared cushion, but it is better to do it on the starting layer of concrete. The thickness of the starting fill should not exceed 20% of the entire height of the tape. Concrete pouring helps create a more even surface on which the reinforced frame is laid. If you decide not to fill the starting layer, then support fungi should be used to raise the reinforced frame above the surface of the pillow by 5-7 cm.
The reinforced frame should be located in space, nowhere in contact with the bedding and formwork.
Pouring concrete
Filling should be done at a temperature of +10 C and above. Before pouring, the formwork must be moistened, then the concrete will lie more evenly. The mixture must be poured in layers, the layer thickness should not exceed 40 cm, optimally 20-30 cm. Each layer is subjected to 5-10 minutes of vibration compaction. This technology does not allow voids to form inside the concrete. To supply the concrete mixture to the formwork, you must use an elastic sleeve or chute.
Layer-by-layer foundation pouring
After pouring is completed, the formwork is covered with a vapor-proof film. Hardening of the concrete lasts 25-30 days, after which the formwork is dismantled and the gaps between the foundation and the trenches are filled with soil.
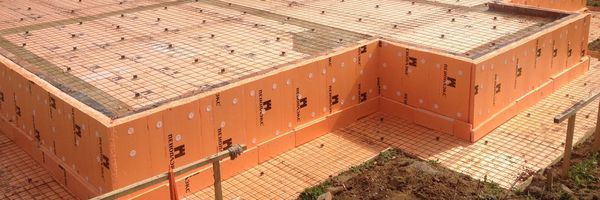
Insulation of a shallow foundation
Professional builders recommend be sure to insulate the MZLF. It is recommended to do this immediately at the time of construction of the structure. An insulated foundation will protect the floors of the house from dampness and cold, which is especially important when arranging the floor “on the ground”. In this case, in the absence of thermal insulation, all the heat from the floor will go into the ground.
There are external and internal thermal insulation MZLF. External - when the insulation is attached to the outside of the monolithic tape, internal - from the inside. External insulation is considered mandatory, but internal insulation is usually done if the house has a basement. What insulation should I use? There are a lot of options. The most popular are:
- Penoplex. Dense thermal insulation, excellent heat conservation. Its service life is significantly longer than that of conventional foam. Penoplex is resistant to rodents, mold and practically does not absorb moisture. In terms of price/quality ratio, this is the best material for thermal insulation of a shallow foundation.
- Expanded polystyrene. The extruded material is slightly inferior to penoplex in terms of physical and mechanical properties. However, the price of polystyrene foam boards is 20-30% cheaper. It can be used in dry and dusty soils with minimal moisture.
- Polyurethane foam. Liquid spray thermal insulation is an expensive option, but it has many advantages: no joints between slabs, a service life of at least 50 years, minimal water absorption and resistance to aggressive environments.
The use of insulation based on mineral wool for thermal insulation of the foundation is strictly prohibited! Mineral wool absorbs moisture well, so the insulation will quickly become damp and lose its heat-insulating properties.
The insulation technology depends on the selected material. The heat insulation slabs are attached to the monolithic tape using glue, and then reinforced with a special mesh. A layer of plaster is applied on top. The finishing of the base is carried out together with the installation of the blind area.
Features of construction of MZLF on heaving soils
Heaving soils do not allow moisture to pass through, preventing it from going deeper, so precipitation accumulates near the surface of the earth. When erecting a building made of blocks or wood on heaving soils, drainage must be done, and the backfill must be at least 30 cm. When building houses, a set of protective measures is taken for the foundation:
- The backfill is made from non-heaving soil. Waterproofing must be installed under the sand and gravel cushion. It is better to use geotextiles, which prevent siltation well.
- Drainage is installed at the level of the sole of the monolithic tape. Drainage pipes are laid at a distance of at least 1 m around the foundation. The slope of the pipes depends on their diameter: the smaller the pipes, the greater the slope should be.
- Installation of insulated blind area. The blind area helps drain water from the MZLF. A layer of insulation under the scaffold prevents freezing of heaving soils around the house.
- Storm sewer installation. The main purpose of a storm drain is to effectively remove precipitation from the site. For a shallow foundation, a well-executed storm drain will avoid flooding and subsequent freezing of heaving soils.
The requirements for the foundation are very high.
The strength and reliability of the foundation are among the main, but not the only tasks assigned to supporting structures.
- Not buried. It is created on absolutely motionless soils - rocks, strong stable soils. It is extremely rare.
- Shallow. Used for construction on durable soils not subject to frost heaving. The depth is less than the level of winter soil freezing.
- Recessed. The depth of such a tape is slightly below the soil freezing level. Used for the most massive and heavy buildings, suitable for most types of soil and hydrogeological conditions.
The choice of the appropriate type is determined by an analysis of all site conditions - soil composition, number and properties of layers, depth of soil water, etc.

What buildings is it suitable for?
Strip foundations are a reliable support for buildings made of various materials:
- Tree.
- Foam and aerated concrete.
- Brick.
- Concrete plates.
The material and number of floors determine the weight of the building, on which the design parameters of the tape depend - the degree of penetration and thickness. Along with the soil characteristics, the building parameters are the main material for performing engineering calculations during design.

How to calculate depth
strip foundation depends on the type of foundation. E if construction is planned option, then it is necessary to rely on the tabular data of SNiP, displaying the depth of soil freezing in a given region.When constructing a shallow type of belt, the composition of the soil, the presence and depth of groundwater are taken into account. The optimal depth is usually considered to be 0.75-1 m, but on stable and dry soils the depth can be slightly reduced.
NOTE!
The most common immersion depth for a shallow belt is considered to be 0.7 m.

How is a shallow strip foundation constructed?
almost completely repeats the recessed version, only with a lower level of immersion.There is a trench in which a drainage layer of backfill is created and a concrete strip is poured.
The base design has fewer capabilities than a full-fledged tape, but for relatively small low-rise buildings its load-bearing capacity is quite sufficient.

Step-by-step DIY installation instructions
Let's consider the procedure for creating a strip foundation:
- Preparation.
- Site marking.
- Digging a trench.
- Laying and arrangement of the drainage system.
- Creation of sandy.
- Production of formwork.
- Installation of reinforcement cage.
- Pouring concrete.
- Wait for hardening.
- Stripping.
- Waterproofing and insulation tape.
- Further work.
The order of actions does not change under almost any circumstances, since all stages are a consequence of previous operations.

Surface marking
The beginning of work consists of removing the top layer of soil and marking the area. For this, wooden stakes are used, which are installed at the intersection points or corner points of the future trench.
The width is selected based on the calculated parameters of the base, but at least 20 cm greater than that of the tape. This is important, since it will be necessary to install formwork inside the trench, and subsequently ensure a sufficient thickness of the backfill layer for the sinuses.
Preparing the trench
Digging a trench is done with an excavator or manually. The second option is difficult, but if difficulties arise with the delivery or approach of construction equipment to the site, it is quite possible. The excavated soil is stored on the sides of the trench or immediately removed from the site.
It is necessary to ensure the same depth, but there is no need to try too hard and level the bottom down to centimeters. The corners of the trench are aligned manually, regardless of the digging method.

Drainage device
The drainage system allows groundwater to be removed from the sand cushion layer, eliminating the possibility of heaving loads occurring in winter.
There are different types of systems:
- Open. It is created on the daytime surface and is intended to drain rain or melt water. Used on dry soils with deep groundwater.
- Closed. Consists of a pipeline system placed in a trench near the belt. Serves to remove groundwater from a layer of sand backfill (pillow), used on soils with the presence or seasonal changes in the level of soil water.
In practice, the closed type is most often used, since there is a danger of water in most cases. A special-purpose pipeline system is installed that receives and discharges moisture into a drainage well.
For high-quality drainage to work, it is necessary to install a filtration piping and have a slope for the natural movement of water. The filtration layer cuts off small organic particles, preventing the inner surface of the drainage pipes from silting.
This helps extend the life of the system and reduces the risk of failure.
Pillow
The sand cushion is an important and mandatory element of the base structure. Its thickness varies, on average it is 20 cm. Typically, clean river sand is used or alternately a 10 cm layer of sand, 10 cm of fine crushed stone and again a 5 cm leveling sand layer.
After filling each layer, careful compaction is carried out using construction vibrating machines or hand tools. It is recommended to shed the layers with water, this helps to seal the pillow better.
NOTE!
Experts recommend following the following criteria for the quality of compaction of the backfill layer: there should be no traces of shoes left on the surface when walking. This is important, since settlement of the cushion is unacceptable, as it will cause deformation of the tape with unpredictable consequences.
Installation of formwork
To create the formwork, edged boards with a thickness of 25-40 mm are used (depending on the size of the tape). First, next to the trench, shields are assembled with a width slightly exceeding the height of the tape. As they are assembled, the shields are lowered into the trench and secured from the outside with inclined stops and vertical support bars.
Cross members are installed from the inside, defining the distance between the panels equal to the width of the tape. The formwork must be strong, ready to accept loads when concrete is poured and hardened. There should be no gaps; all gaps larger than 3 mm must be filled with tow or clogged with slats.
This will eliminate wasteful consumption of concrete when leaking into the cracks.

Reinforcement
The reinforcement is designed to compensate for tensile axial loads that concrete cannot withstand. It easily takes a lot of pressure, but when bending the tape is unstable and breaks immediately.
For reinforcement, a reinforcing belt is created, the main element of which is horizontal working rods made of metal or fiberglass ribbed reinforcement.
To support the rods in the required position, smooth rods of smaller diameter are used, from which vertical elements (clamps) are made, which, in combination with the working rods, form a spatial lattice.
Its dimensions are such that the horizontal rods are immersed in concrete to a depth of 2-5 cm.
Working rods are selected based on the width of the tape. Their diameter for a shallow base is in the range of 12-14 mm (with a width of 30-40 cm) or 16 mm with a larger width.

Knitting reinforcement
The connection of reinforcement frame elements is made in two ways:
- Electric welding.
- Knitting with soft steel annealed wire.
The first option is used for thick rods and is practically not used when constructing shallow foundations. The assembly of the arm belt most often occurs using the knitting method.
A soft wire is used, which quite reliably holds the frame elements, but has a certain degree of freedom, which allows maintaining the integrity of the frame when loads occur during pouring.
For knitting, a special hook-shaped tool is used. A piece of wire about 25-30 cm long is folded in half. The resulting half-loop wraps around both connecting rods in a diagonal direction, the ends rising upward.
Then, grab the fold loop with a hook and, leaning on the second free end, make 3-5 rotational movements, due to which both rods are tightly and firmly connected to each other.
The operation is simple, usually the skill is developed on the first day.

Selecting concrete for pouring
There are quite a few grades of concrete designed for different conditions and loads. Since shallow strip foundations are mainly used in low-rise private construction, the optimal choice would be M200 grade concrete.
It is able to provide the necessary strength and load-bearing capacity of the belt with a relatively low dead weight.
For those who want to approach the issue more carefully, we can recommend using an online calculator to calculate the grade and amount of concrete. The result obtained should be duplicated on another resource to protect yourself from possible errors.

Fill
Filling must be done as quickly as possible, ideally at once. Breaks in pouring for more than a day are unacceptable; in such cases, it is necessary to keep the concrete until it hardens completely and only then continue work. The quality and strength of such a tape is much lower than that of simultaneous casting.
This condition is most easily met by using ready-mixed concrete, which is delivered directly to the site in the mixer. The result is a significant saving of time, and the quality of the concrete will in any case be better than that of a homemade solution.
It is necessary to pour from several points, trying to distribute them as evenly as possible along the length of the tape.. This will allow you to obtain a casting with the same parameters around the entire perimeter, which will ensure high strength of the base.

Features of waterproofing
Exposure to moisture is extremely detrimental to shallow tape. Penetrating into concrete, water sooner or later freezes and tears the material from the inside. This should not be allowed under any circumstances.
There are two types of waterproofing that you can do:
- Horizontal. Protects the lower and upper plane of the tape from moisture penetration from the lower layers of soil and from rain or melt water flowing from the walls. The lower waterproofing is laid before installing the formwork and reinforcing belt, and the upper one is done after the concrete has completely hardened in parallel with the vertical waterproofing. Both layers consist of roofing felt laid in two layers coated with bitumen mastic.
- Vertical. Apply to the outer and inner surfaces of the tape after stripping and complete drying. Materials of different types of action are used - impregnation, coating or pasting. Impregnations are the most effective, but they appeared relatively recently and are little known to builders.

Insulation issues
Insulation of the tape eliminates the formation of condensation. There are two options - external and internal insulation. In the first case, the insulation is installed from the outside, in the second - from the inside.
Experts recommend performing both types of insulation at the same time, since it is impossible to achieve the expected result separately. Taking into account the specifics of placement, it is necessary to use moisture-proof types of heat insulators - foundation penoplex, liquid polyurethane foam, polyethylene foam, etc.
Mineral wool should not be used in this case, as it can absorb water with complete loss of performance.
Proper care of concrete after pouring
After pouring, it is necessary to regularly water the surface of the tape with water for 10 days.:
- The first 3 days - every 4 hours.
- The next 7 days - 3 times a day.
The tape must be hidden from the scorching rays of the sun under a layer of polyethylene. Watering with water allows you to somewhat equalize the moisture content of the outer and inner layers of the tape, reducing loads and the risk of cracks.
The final hardening of concrete takes a very long time, but you can continue working with the tape after 28 days.
Stripping
Stripping is the procedure for dismantling formwork. It can be done no earlier than 10 days after pouring.
You should not try to speed up the process; the foundation is too important an element of the building to take risks and rely on chance.
Basic mistakes
Most often, sedimentation of the sand cushion occurs due to poor compaction of the backfill layer. In addition, the use of unsuitable materials, especially concrete of the wrong grade, is often encountered.
Some unscrupulous suppliers deliver low-quality material to save money. Experienced experts recommend ordering heavier concrete - instead of M200, take M250. The difference in cost and weight is small, but there is hope that the material will be more durable.
In addition, they often try to reduce the cost of money and labor by abandoning and. These procedures require some time, but, compared to the service life of the base, they are performed very quickly and cannot be neglected.
Useful video
In this video you will learn how to install a strip foundation:
Conclusion
Creating a strip foundation is not so much a difficult task as it requires a full understanding of the meaning of all stages and high-quality implementation of the necessary actions.
For an untrained person with no experience, it is recommended not to deviate from the technology and strictly comply with the requirements of SNiP.
This will help build a strong and high-quality shallow strip foundation.
In contact with
The importance of the foundation for any building is difficult to overestimate, because a reliable foundation of a building is the primary condition for its long-term trouble-free operation. You can build any, no matter how strong and beautiful walls, a well-designed and installed roofing system, reliable floors, and carry out expensive finishing. But all this can “go to waste” if errors were made when calculating the foundation, and during its construction, negligence was shown, unacceptable simplifications were made, low-quality materials were used, and the established technology was violated.
So, the foundation is a key stage of any construction, which sometimes takes up to a third of the total budget. In an effort to save some money, some potential homeowners are seriously thinking about the problem: is it possible to build a foundation with their own hands? The answer to this question, unfortunately, is not obvious. It’s one thing to create the foundation for a small country house, garage or outbuilding, and quite another thing to create a full-fledged country mansion with several levels, and even with adjacent extensions.
This article will discuss the main types of foundations, but the main emphasis will be on its strip variety. We hope that after reading the article, many visitors to the site will become more clear whether they should undertake the construction of the foundation themselves, or whether it would be better to use the services of specialists.
Main types of foundations
There are quite a lot of varieties of foundations used in individual construction, but mainly four basic schemes are used, as well as their various combinations. And the main types include strip, columnar, slab and pile foundations.
Strip foundations
This is the most commonly used scheme, as it is suitable for almost all construction conditions, with the exception, perhaps, of regions with close permafrost or for buildings built literally “on the water.”

Despite a certain difference in the technologies for constructing strip foundations of various types, they all have a common feature - this is a continuous, closed strip-base along the entire perimeter of the house being built and under the internal load-bearing structures. The tape itself is buried in the ground to the required calculated value, and protrudes from above with its base part. The width of the tape is maintained the same throughout the entire foundation - this parameter should also be based on the calculations performed.
The foundation is the basis of every residential building. The operational characteristics of the building, its stability, strength and safety depend on its strength and reliability. After all, it bears the main load from the entire structure, which is why its competent construction is so important.
If the planned construction is small in size, all the necessary measures can be done independently. For construction or other large-scale construction, it is advisable to turn to professionals.
Preparation of materials
Usually for such work they use high-quality. You can make the mixture yourself, or you can order it ready-made. The process is quite labor-intensive, which explains the heterogeneity of the base filled in individual portions.
The composition of concrete for the manufacture of strip base includes:
- cement, gravel and coarse sand in a standard ratio;
- clean sand (river) for arranging a pillow;
- 2 cm planed board for making;
- and a steel rod 8-12 mm in diameter.

From marking to filling
Site marking
 One of the important stages is. First, the site is cleared of foreign objects and small debris. Next, everything from the site is cut off to a depth of approximately 15 cm to limit further rotting processes in the basement of the building.
How is marking done?
- Find the location of the first corner of the building axis. Using a plumb line, pegs are installed: they can serve as suitable pieces of reinforcement.
- Find the following angles, second and third using twine and pegs. They install pegs there too.
- Stretch the cord towards the fourth from the previous ones, make the correct angle along the square, and also place a peg.
- Check the diagonals the resulting rectangle repeating the outer perimeter of the building. They should be even if the corners are built correctly.
- Similarly, outline the internal foundation, as well as its parts for individual components: porch, supports for columns, load-bearing walls.
- Install slats or planks of wood to align the markings in the horizontal plane, a rope is pulled through them.
Ground work

Temporary supports must be provided to prevent soil from collapsing!
Formwork
 Using a rope, mark the outline for. Install supports at the corners. This requires beams 5 centimeters thick.
The formwork is made from edged boards, which are connected using corners with screws or wooden blocks.
The corners and bars are located outside the formwork, the heads of the screws remain inside.
Armature

Welding violates the corrosion resistance of the material in the places where it is exposed, so its use is not recommended!
The process of pouring a strip foundation for a house
 If concrete is ordered, the pouring is carried out at once, simultaneously. Layer-by-layer filling is done if the mass is prepared on its own.
Step-by-step pouring of strip foundation
- First, the concrete is prepared.
The sand is sifted, mixed with cement and water, stirred evenly. The prepared composition is poured into crushed stone, the amount of which is equal to the amount of sand. Mix well so that all the crushed stone is evenly moistened. - Concrete mixture is poured into the self-made formwork.
To ensure high-quality filling and prevent the formation of bubbles, the concrete is pierced with an iron rod and compacted with a wooden beam. It is more convenient to use a special construction mixer or with an attachment for this. - Fill the formwork with concrete mixture to the marked level.
To speed up the settlement of concrete, tap the formwork from the outside. - Smooth the surface concrete with a trowel or rule.
- The concrete surface is sprinkled with sifted dry cement powder.
You can do this evenly through a sieve. This procedure will ensure quick setting of the concrete surface and prevent its cracking or erosion. - Concrete is covered with covering material or regular burlap.
It is left in this form for about a month to ripen. If the weather is hot and dry, then the top cement layer is periodically wetted to avoid drying out.
Only after the final maturation of the concrete monolith can we move on to further construction and begin.
When the formwork is removed, it is necessary to perform high-quality work. This will improve the moisture-insulating and heat-retaining functions of the foundation, as well as increase its service life.
Useful tips
- It is better to make sure in advance that the ordered machine will pour concrete mixture from any angle.
- It is advisable to take care of making an additional tray: the composition will be supplied into it.
- The solution must be checked before pouring - sometimes it hardens a little during transportation.
- In the rain, take care of a reliable shelter, otherwise the top layer of cement may be washed away by jets of water.